1 Basics
1.1 Purpose of this document
The purpose of this document is to provide a step-by-step tutorial on how to install certificates in Mozilla Thunderbird, sign e-mails and to encrypt them and how to receive signed and encrypted mails which you can decrypt later on. You can download this manual as a PDF here: http://www.globaltrust.eu/thunderbird-anleitung-en.pdf
1.2 Definitions and abbreviations
S/MIME:
– Standard for signing and encryption for e-mails.
-LDAP:
– abbreviation for „Lightweight Directory Access Protocol“ and gives you the opportunity to connect to a directory service over an IP network (e.g. internet). The directory could be a contact directory, like in this tutorial.
2 Short version
Install certificate:
– Download the root certificate from: https://www.globaltrust.eu
– Import the crt fie in the certificate manage of Thunderbird under the tab „certification bodies“
– Import the personal certificate under the tab “Your certificates” (ð 3.1.3 Installation certificates for signing p7)
– Choose the certificate for signing in the account settings under the category S/MIME safety.
→ Done
Sign e-mails:
– Create new e-mail.
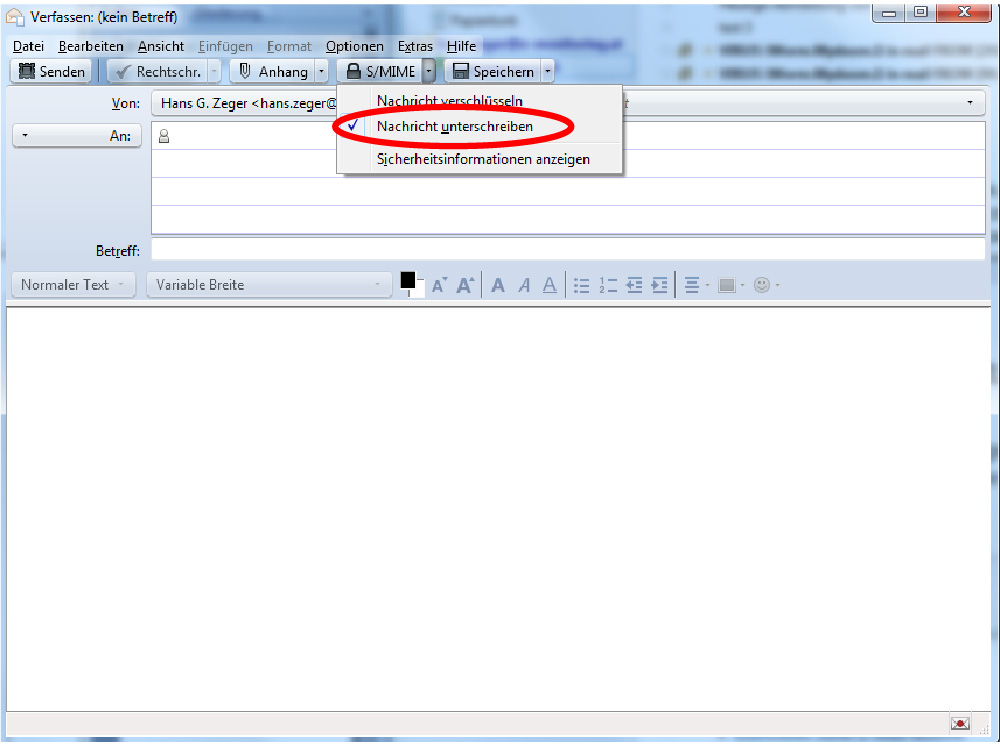
– Choose S/MIME in the menu bar and then “sign message”. Afterwards, a sealed envelope symbol will appear in the right bottom corner.
→ Done
Encrypt e-mails:
– Open the certificate manager, go to the tab “Persons” and import the certificate of the recipient.
– Create new e-mail, decide S/MIME in the menu bar and then “Encrypt message”. Afterwards, a lock symbol will appear in the right bottom corner.
→ Done
Receive signed/encrypted e-mails:
– Open e-mail with double click.
– At the top right you can see the sealed envelope and, if the message was also encrypted, the lock. By clicking on one of the icons, the details of the signer and the signer’s certificate can be retrieved.
→ Done
LDAP installation short version
Open the address book and after that under “New” you can find the option “LDAP Directory” which you choose.
Insert the server data (without the quotation marks):
– Name: „GLOBALTRUST“
– Server address: „ldap.globaltrust.eu“
– Basis-DN: „c=at“
– Port-Number: „389“
Select “GLOBALTRUST” in the address book on the left side, and now you can search in the right top corner.
→ Done
3 Detailed documentation certificate management
3.1 Installation of certificates
Purchase suitable S/MIME certificates:
– purchase GLOBALTRUST CLIENT https://order.globaltrust.eu/php/formservice.php?form=order_signature_en&st=CLI
– info GLOBALTRUST COMPANY: https://globaltrust.eu/en/company/
– note: for encrypted e-mail communication, both sender and recipient need a suitable key (certificate)
3.1.1 Import Globaltrust Root-CA certificate
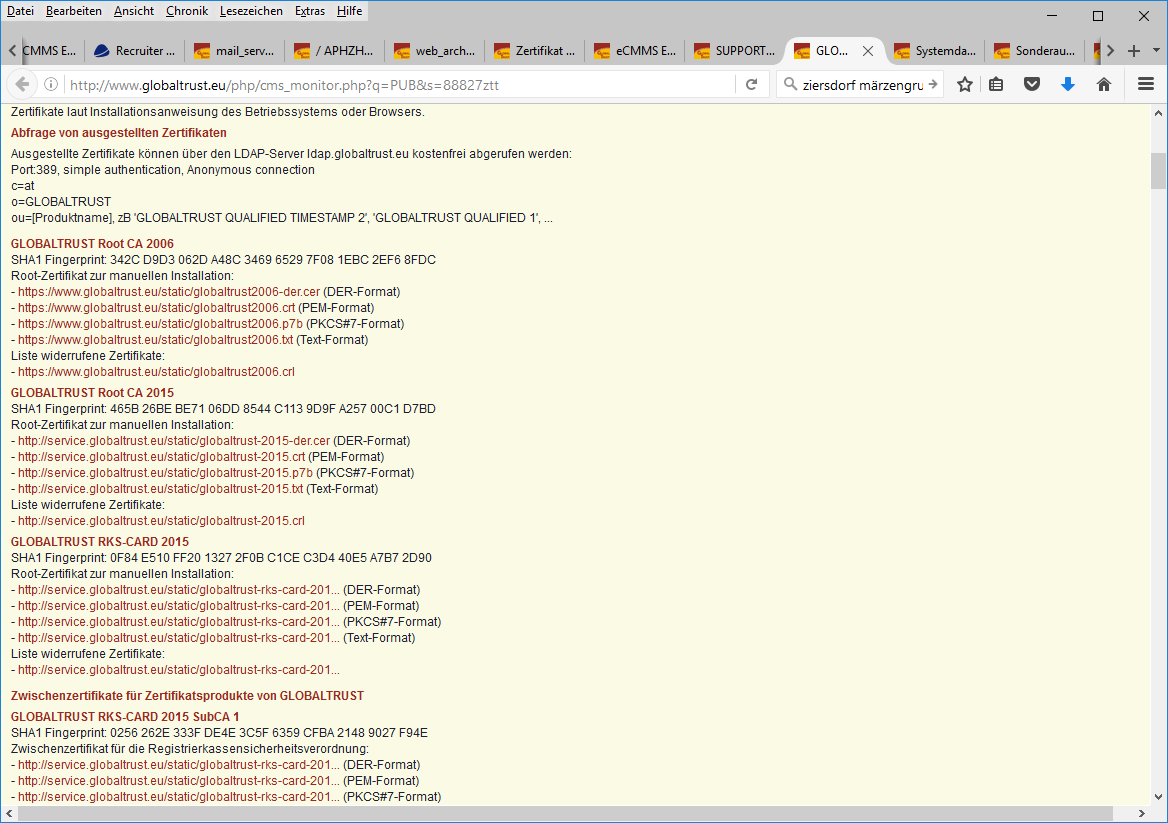
Legend:
– Open http://www.globaltrust.eu/certificate-policy.html
– In the sections „GLOBALTRUST Root CA 2006“, „GLOBALTRUST Root CA 2015“ and „GLOBALTRUST Root CA 2020“ click on the download links for the “DER-format” and save the file.
Direct links of the GLOBALTRUST Root-CA certificates:
- http://www.globaltrust.eu/static/globaltrust2006-der.cer
- http://www.globaltrust.eu/static/globaltrust-2015-der.cer
- http://www.globaltrust.eu/static/globaltrust-2020-der.cer
3.1.2 Open Thunderbird options
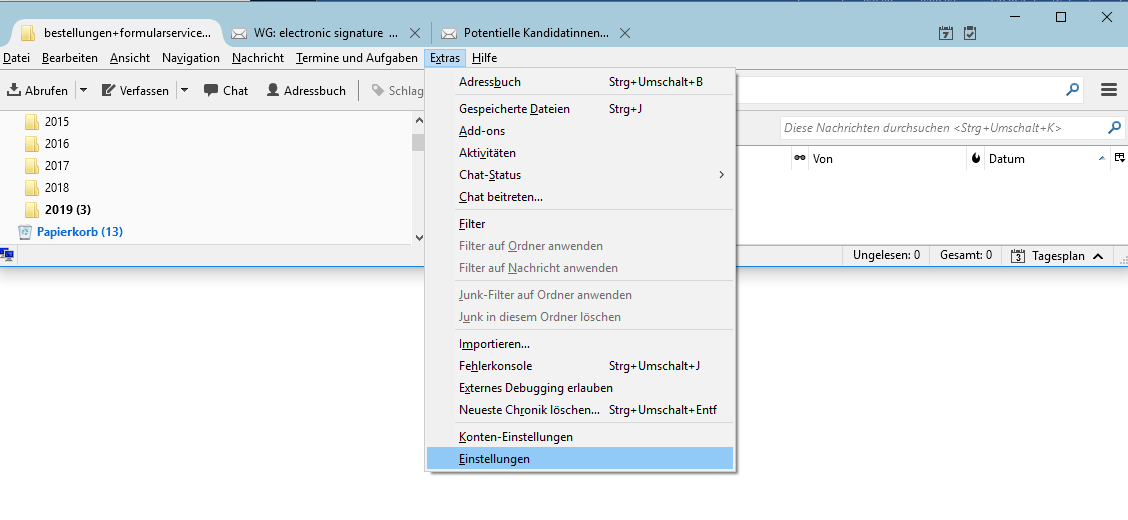
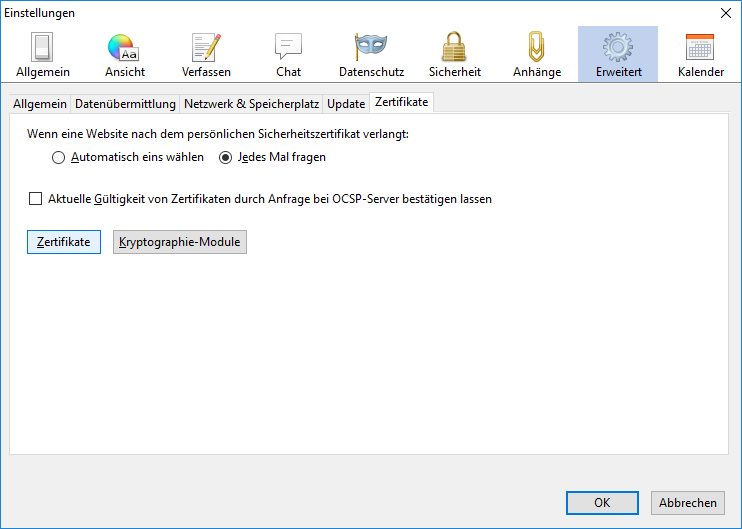
→ Extras → Settings → Advanced → Certificates → Certificates → Certification bodies → Import
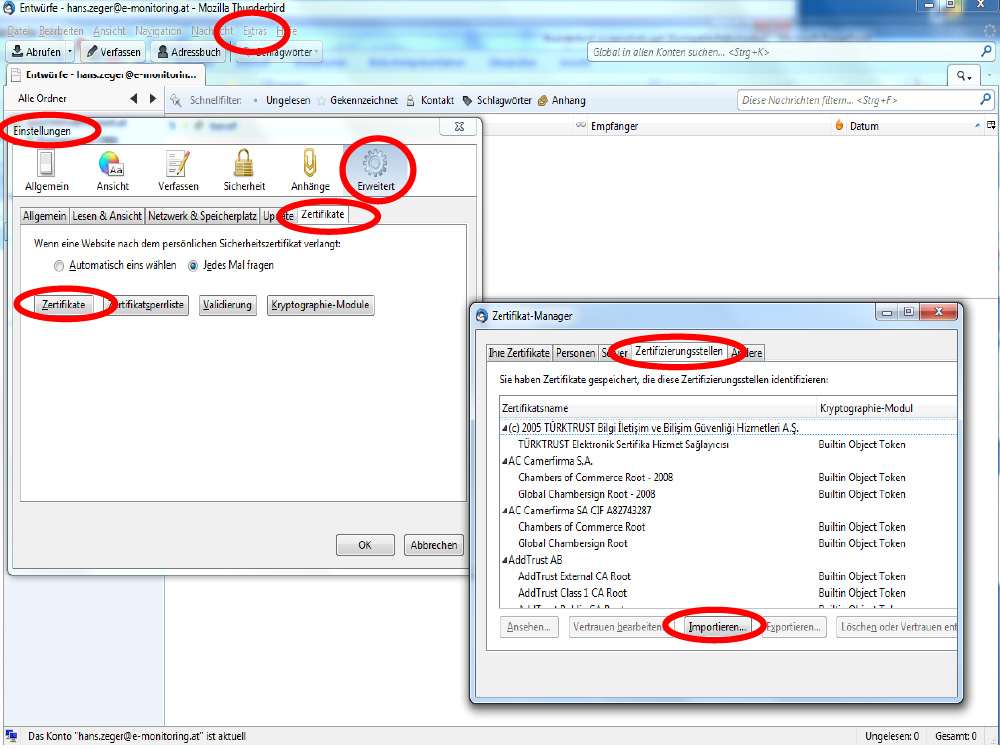
→ Open
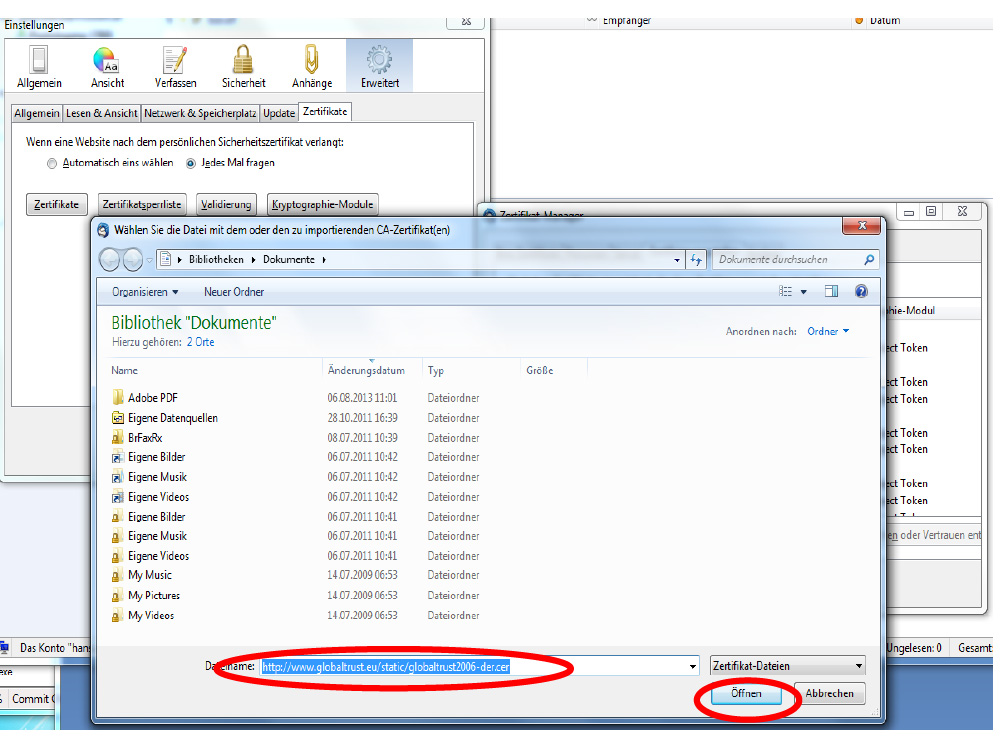
→ tick all boxes → OK

Open window: → Certificate Manager → Settings close it
The GLOBALTRUST Root-CA certificate is installed.
3.1.3 Install certificates for signing
3.1.3.1 Import Software-certificates
Software-certificate + key can be used because of the import of the PKCS#12 file.
→ Extras → Settings → Advanced → Certificates → Certificates → Your Certificates → Import → Choose directory (here C:\temp) → Choose file type PKCS12 ð Pick the suiting PKCS#12-file (here Filename: mein-software-zertifikat.p12) → Open
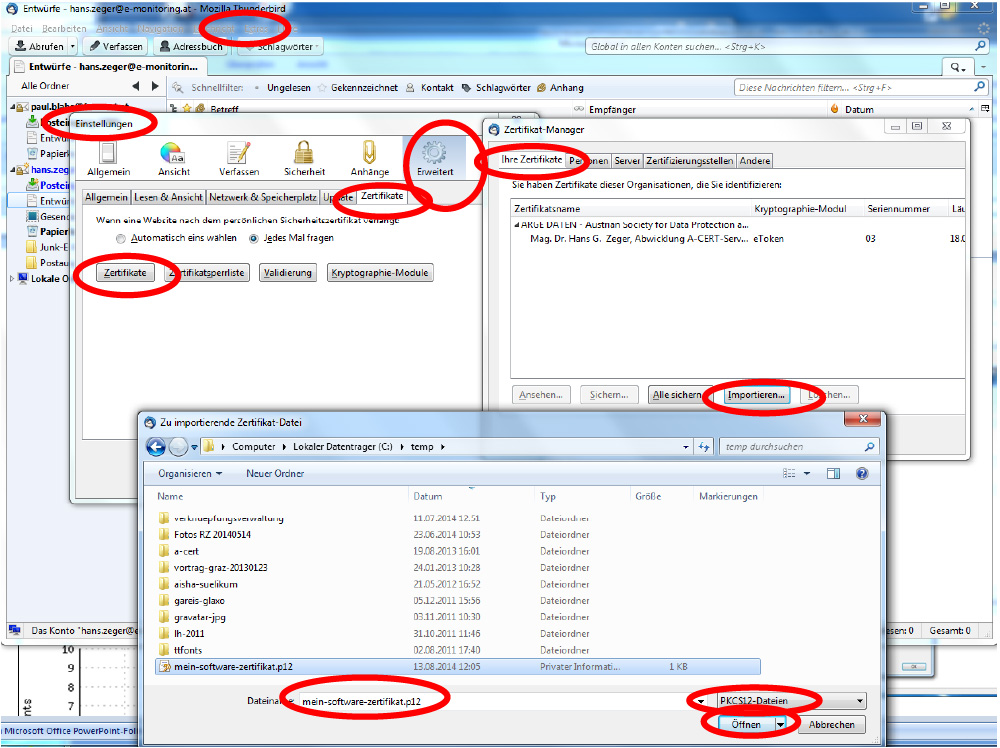
→ Password entry dialog → Password: your chosen PKCS#12-Password → OK
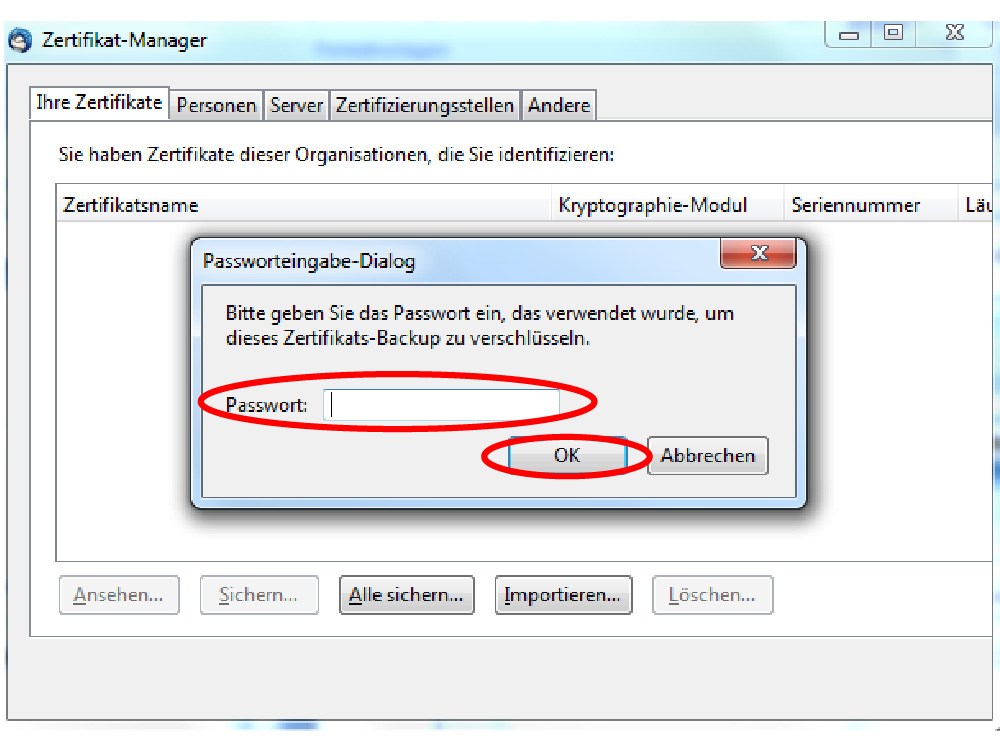
Your software certificate + key is now installed!
3.1.3.2 Import E-Token certificate Safenet (Previously Aladdin)
Certificates on external devices (Smartcards, eToken) can be used with a PKCS#11 interface. The module for that PKCS#11 interface needs to be imported to Thunderbird.
→ Extras → Settings → Advanced → Certificates → Cryptography modules → Load
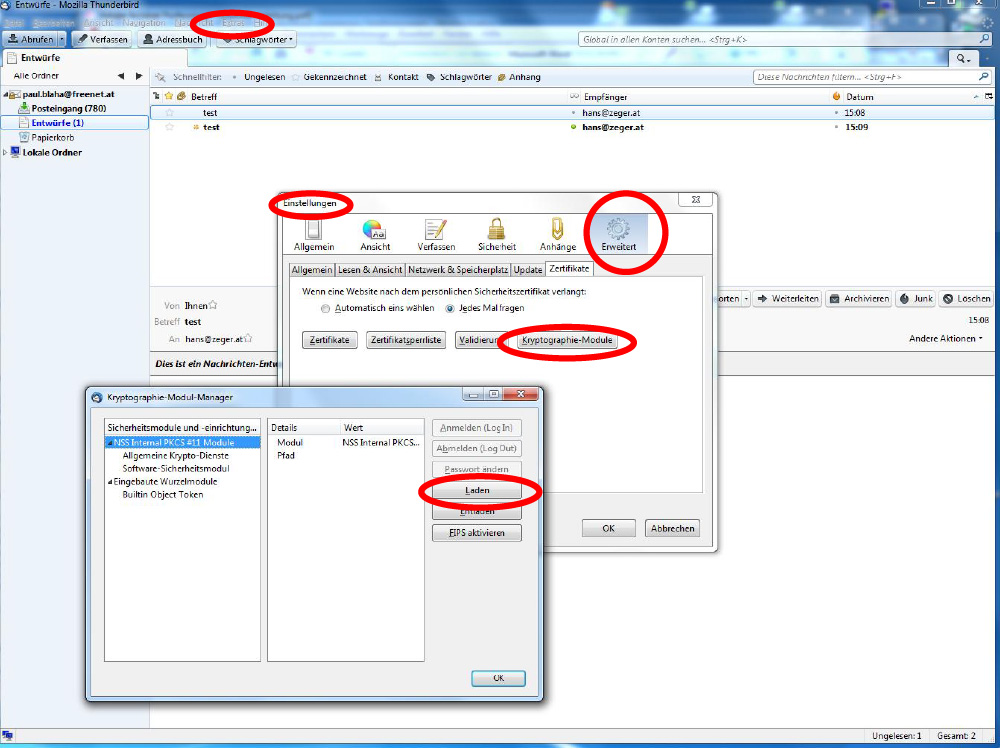
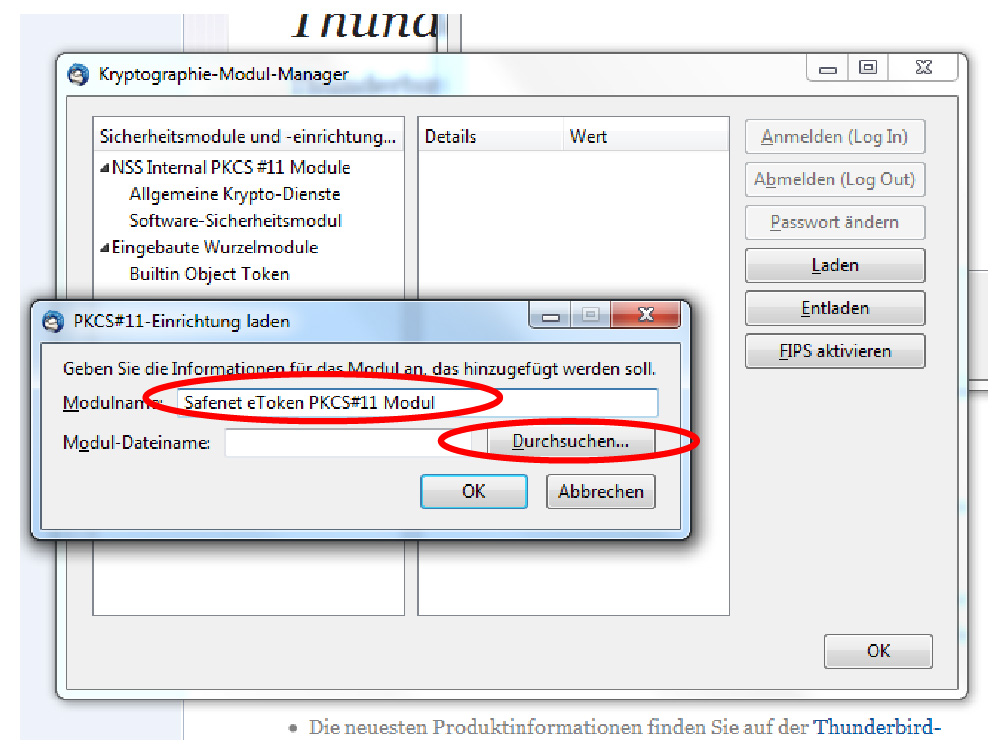
→ Rename to a suiting Module name, Recommendation: SafeNet eToken PKCS#11 Module → Search
→ C:\Windows\System32 → choose the eTPKCS11.dll file → Open
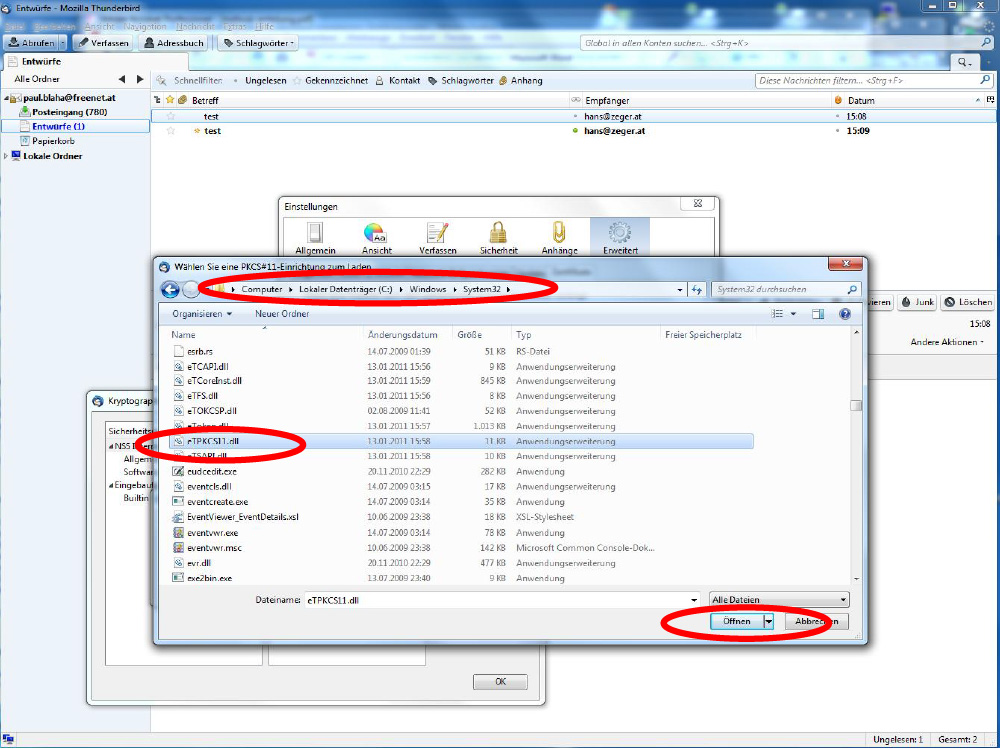
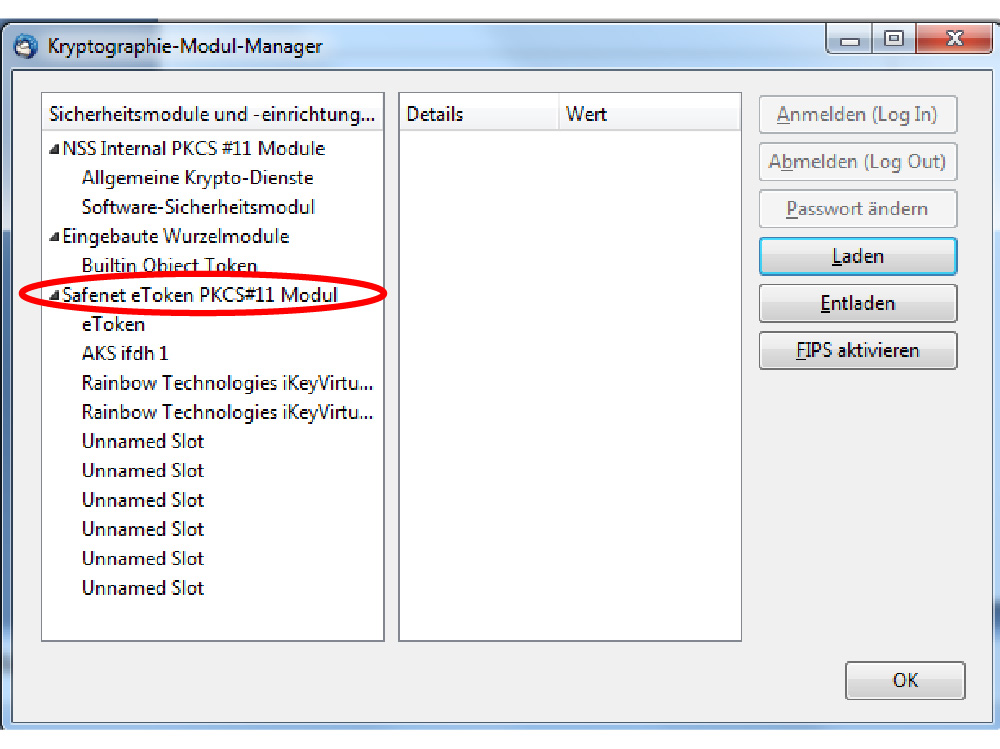
Safenet-E-Token is now prepared for signing/encrypting!
3.2 Set up certificates for signing
→ Extras → Account Settings
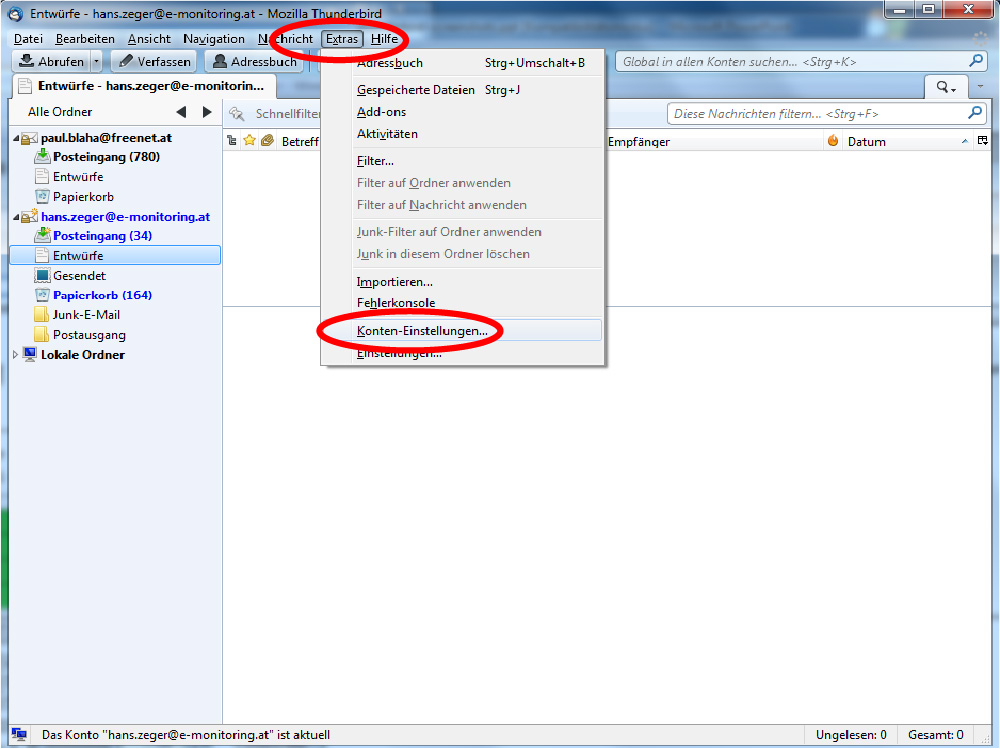
→ Choose user account, example: hanxxxx@xxxx.at → S/MIME-Safety →Choose (certificate for signing) + Choose (Hint for the certificate to encrypt! Here you have to choose the receiver certificate, not your own one because otherwise the receiver will not be able to decrypt the e-mail!)
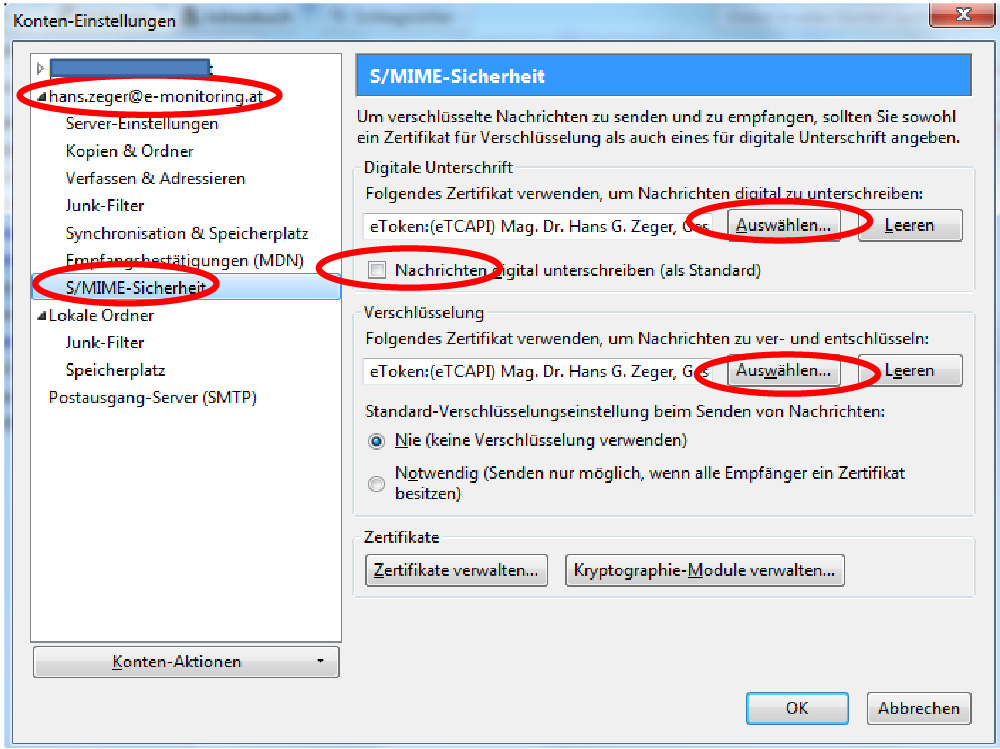
Optional: → choose to Sign messages digitally, so it will be signed always
3.2.1 Create message and send signed
→ Create
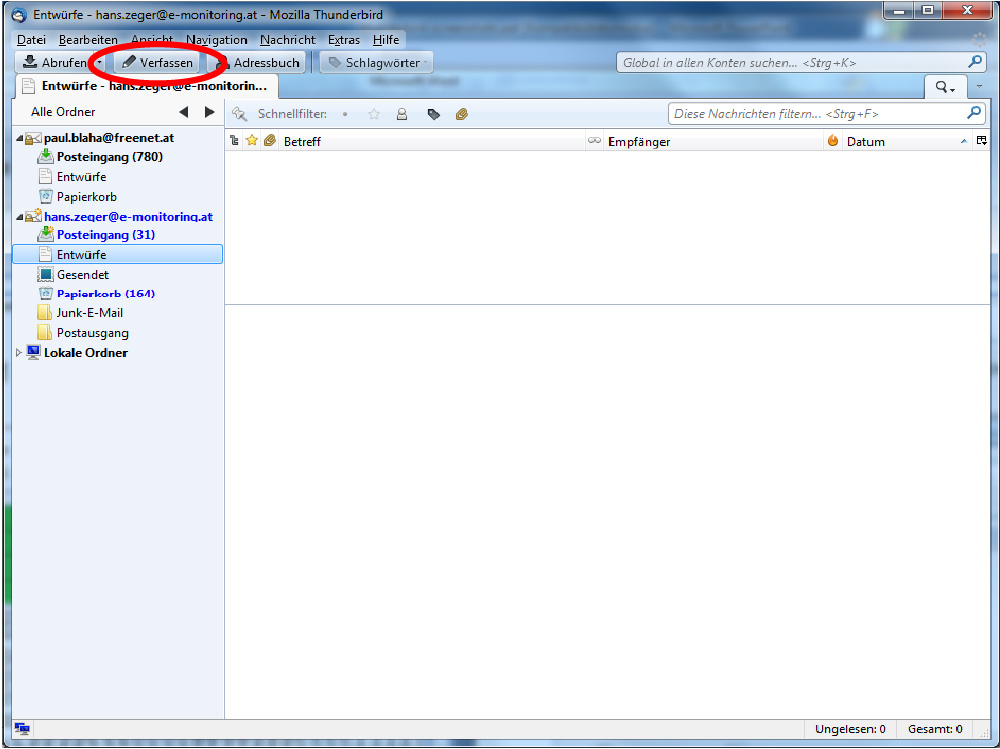
→ S/MIME → Sign message
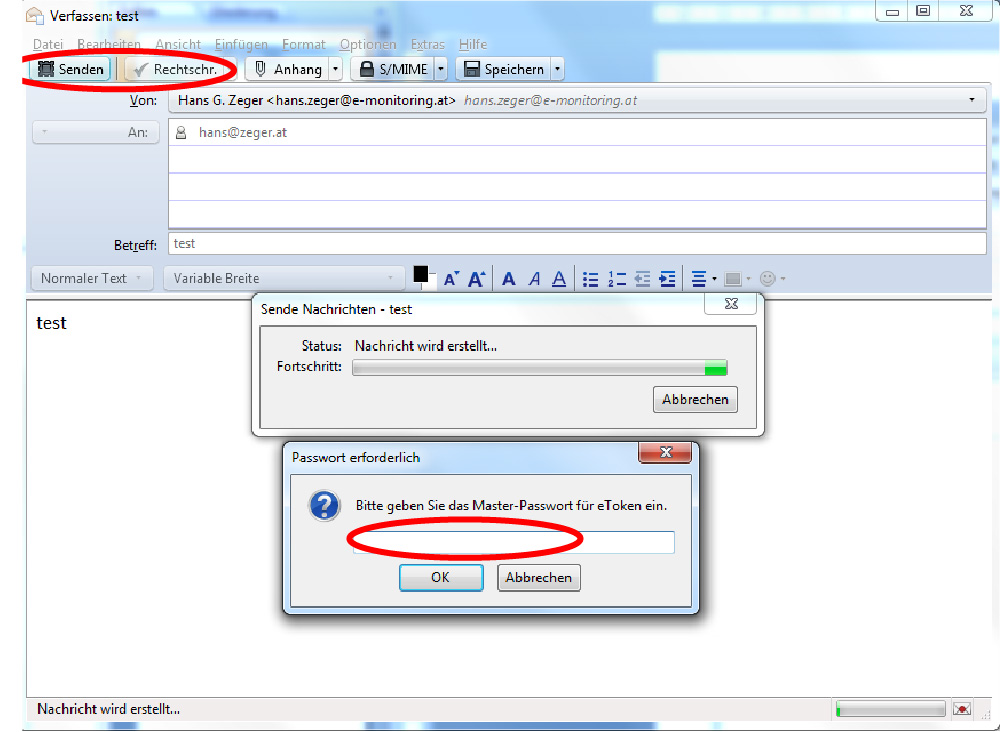
→ send → there will pop up a window where you have to put in the E-Token password (only with an E-Token certificate), otherwise it will ask you for the password of the software certificate
3.3 Encrypt e-Mail
3.3.1 Import receiver certificate
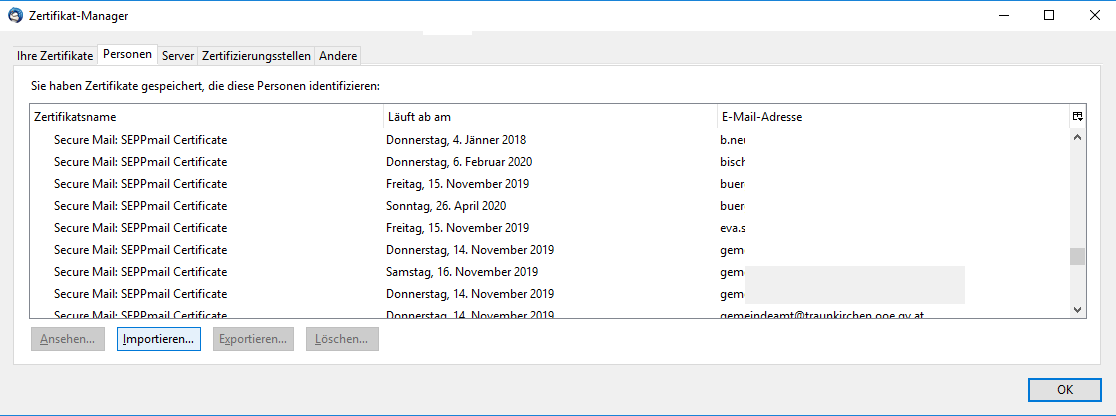
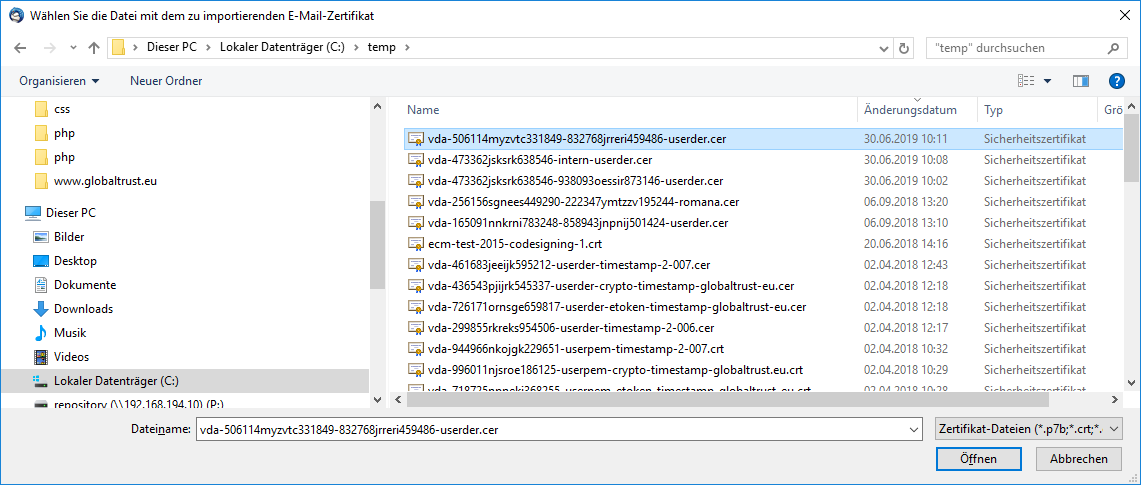
“Open” → OK → OK → done
3.3.2 Create new mail + encrypt
Choose “create” in the main window
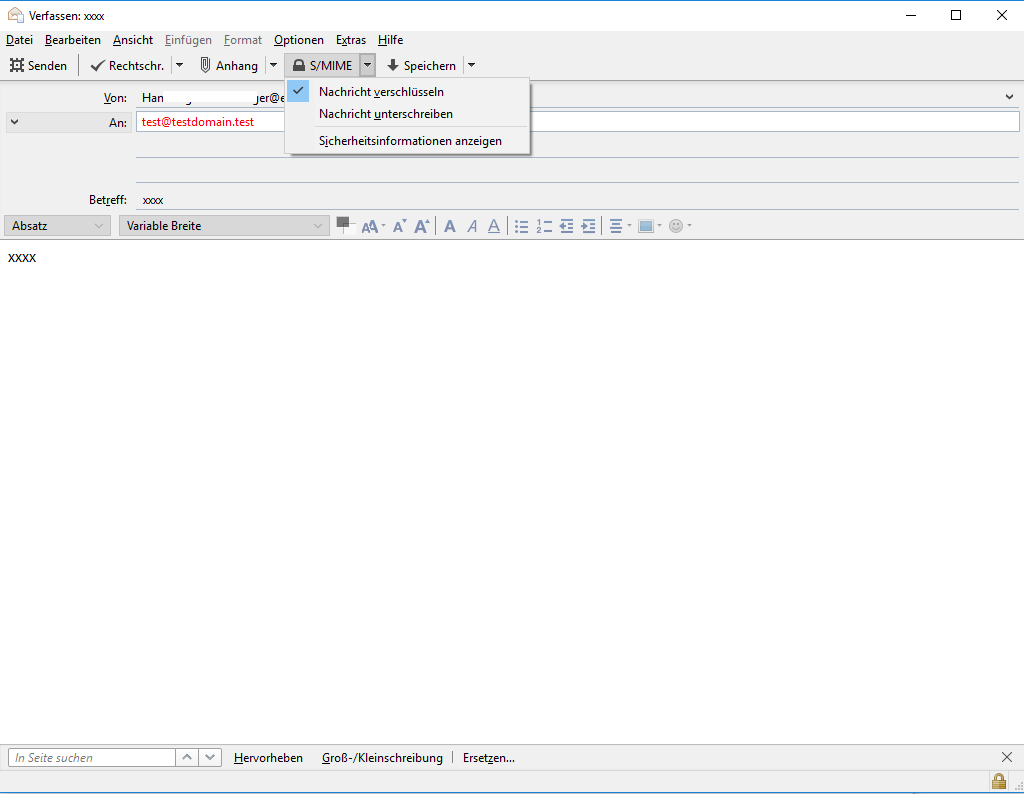
Hint I:
“Encrypt message“ is only available, if the receiver certificate is already installed (here: test@testdomain.test).
Hint II:
The Message can be signed also, but the key and the certificate of the e-mail sender have to be installed.
Hint III:
The subject of the e-mail is not being encrypted!
3.4 Receive signed/Encrypted e-mails
3.4.1 Open received e-mail
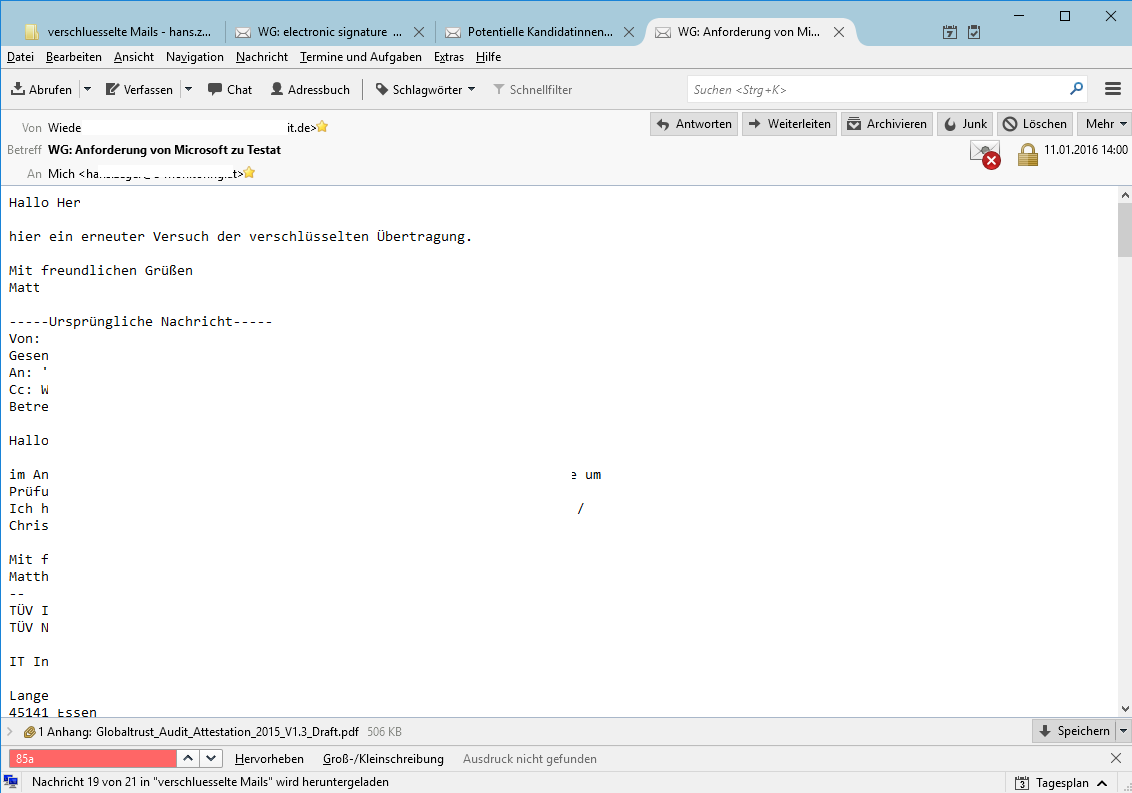
– After double-clicking the received e-mail, there should be the two symbols in the right top corner (lock and sealed envelope) that’s how you can see if the mail is signed and encrypted.
3.4.2 Check signature
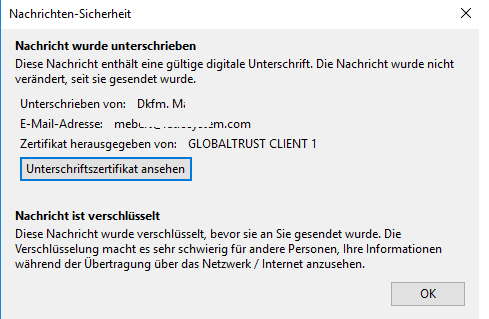
– Clicking on the symbols opens the details for signing and encryption. If you click on „View signature certificate“ you can see the details from that certificate.
– You can close the window by clicking the OK button.
3.4.3 Show certificate details
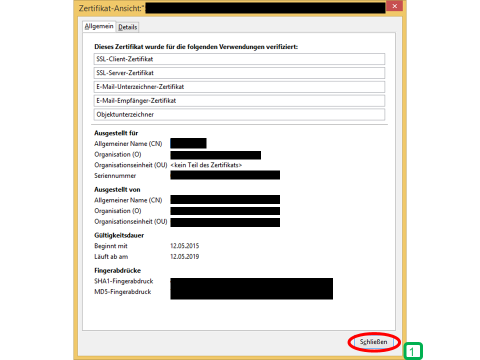
Legend:
After checking the certificate, you can close the window with the “close” button. → Done!
4 Mozilla Thunderbird LDAP Address book
GLOBALTRUST provides its customers with an LDAP directory. All certificates issued by GLOBALTRUST can be found in this directory. This makes it possible to send encrypted emails to anyone with a GLOBALTRUST certificate. It is also possible to integrate this directory into the Mozilla Thunderbird address book.
4.1 Detailed documentation LDAP
4.1.1 Open Address book
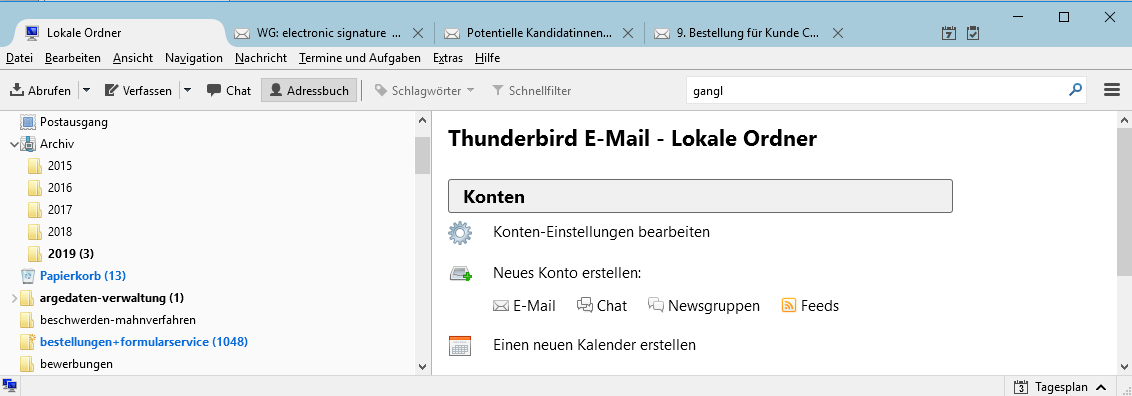
– Click on “address book” in the main window
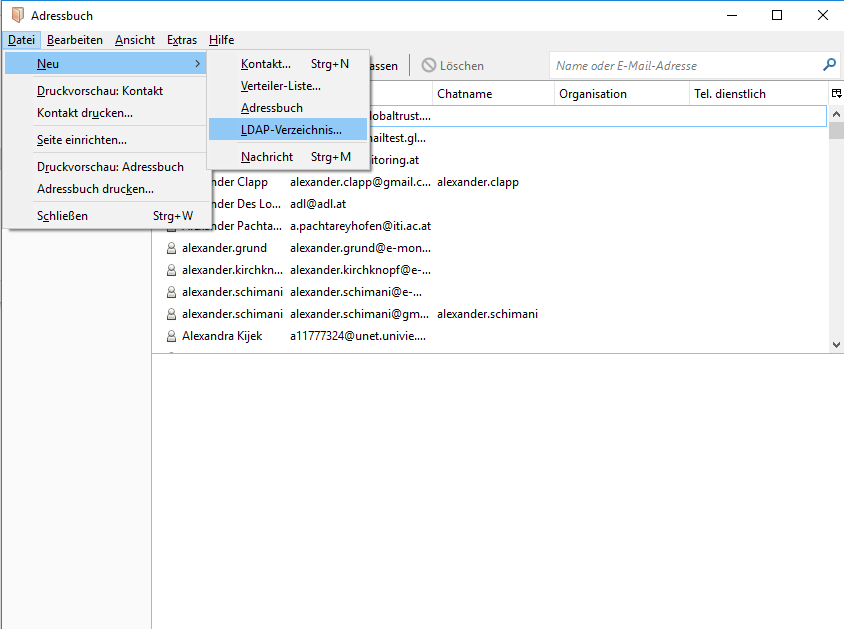
– Click on File → New → LDAP-directory…
4.1.2 Fill in server details
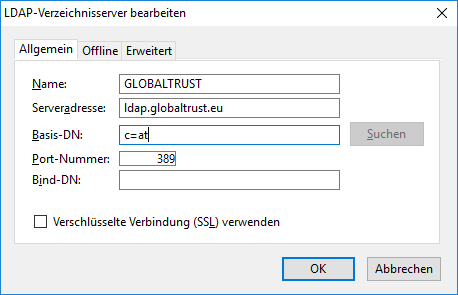
Legend:
– Enter the information for the directory in the new appeared window.
– Name: „GLOBALTRUST“
– Server address: „ldap.globaltrust.eu“
– Base-DN: „c=at“
– Port-Number: „389“
When filled in all data, click on “OK”.
4.1.3 Search for entries
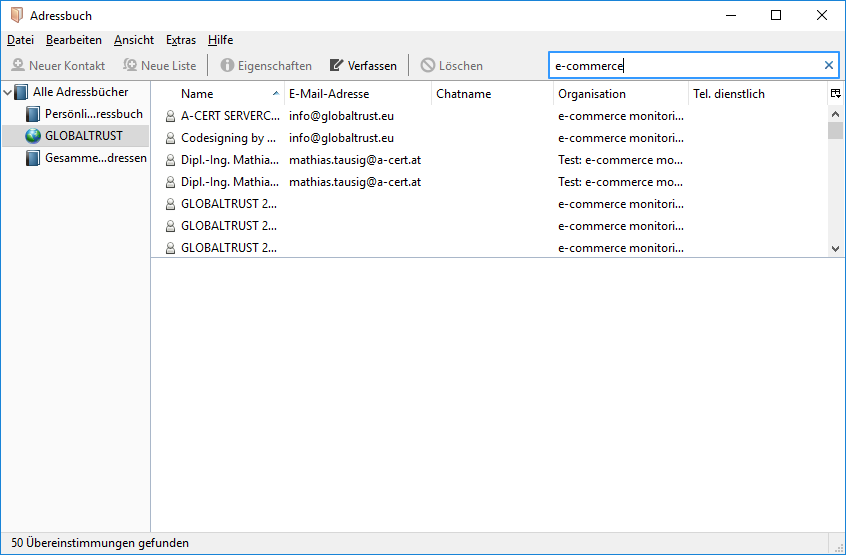
– Choose the fitting address book on the left side. Here “GLOBALTRUST”.
– On the right top searching bar, you can look for the desired name/e-mail address. In the list below, you can select the right entry. → Done!
You could also like…

QES & Competition Law – European Commission to require electronic signatures from 1st September, 2023
To further simplify merger control procedures and in line with its overall digital strategy, the European Commission has published a number of revised legal texts, including one that will make electronic transmission of electronically signed documents the default method from 1 September 2023. Read on to find out...

On letters, stamping and (e-)seals
On letters, stamping and (e-)seals Still stamping or already sealing? Fully automated and at the highest security level? If no, you should think about it: You can use the electronic seal as a digitization turbo and make it the central game changer of your organization. Did you know that there are administrative...

Encryption and digital signature of e-mails: free of charge for new UPC-customers
Cyber attacks on companies and public authorities usually begin unspectacularly - with an e-mail. Malware is used to introduce computer viruses into the IT system with the aim of extorting a ransom or committing industrial espionage or data theft. Employees are often not to blame, as phishing attacks are becoming...
Verify your company in the EPREL database
The European Product Energy Labelling Database (EPREL) requires the use of qualified electronic seals to ensure the authenticity of uploaded information. Since February 2022, suppliers have to digitally verify their identity on the EPREL platform using electronic sealing technology. The European Commission...
These great companies rely on GLOBALTRUST
How can we get in touch with you?
Contact our team: +43 1 532 0 944
Our employees are available for an obligation-free consultation.
Availability: Mon-Fri 9:00-17:00

